

Projects
Project 1 - Scrubbies -- Makes 3
Material: 1 yard of any color Nylon Net, preferably soft (only for the hands)
Size J Hook, some have used the next up and down.
Cut material into 2-inch strips. You use 6 per scrubby. Tie 2 strips together, crochet 5 chain, connect to make circle, crochet in each space two sc. At the end of the second strip tie 3, 4, and 5. Crochet in each space one sc. At the end of the fifth strip tie #6. Crochet in every other space sc, making sure that your tied ends are tucked inside. Any left from the 6th strip, tuck inside.
Project 2 - Body-Puffs
Material: about 1/4 yr soft tulle
Cut tulle in strip about 5" wide & width of material....can make it double or triple thickness if you wish. Stitch by machine down center of strip, hold onto thread at one end & pull one thread to gather tulle into ball. Catch with thread & tack off so it remains in ball. If you wish to insert a double length of satin ribbon before gathering, you'll have one that looks "store-bought". Would be pretty to layer different colors i.e. light lavender, dark lavender & purple tulle. It is folded over and sewn together and the edge has a hem then elastic is run through it and pulled tight! There are several of these put together and the elastic is in the middle I like it better then the store bought but I can't sew
Project 3 - Crochet Pot Scrubbers
You need a size H, I or J crochet hook. By the firmest netting that you can find. Cut the netting into 2" widths. It is almost Impossible to keep it neat while cutting, so just do your best. Tie the strips together with knots and wind it in a ball to work from. You can double crochet (dc) or half-double crochet (hdc) as you choose.
Row 1: Make a slip st and chain 4. Dc 9 into the 4th ch from the hook, join.
Row 2: Ch 3, 2 dc in each st around and join.
Row 3: Ch 3, *dc in next st, then 2 DC in next st. Continue in pattern from * and join.
Row 4: Ch 3, *1 dc and decrease in next 2 sts. repeat from * around, join.
Row 5: Ch 3, decrease in every 2 sts around until you can close up the hole in the middle. Fasten off.
While crocheting, you will come to know where it is tied, work these to the inside, which will give them more scrubbing power. Have Fun!
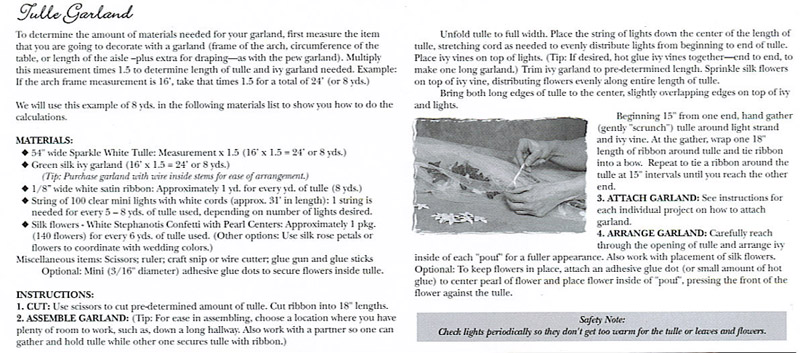
Project 4 - Tulle Garlands
More Garlands...
Project 5 - Easy Scrunchy
Cut off a long strip of nylon netting about 24 inches long. The longer the thicker. It should be around 8" wide. These measurements are only estimates and you can adjust it to any size you want. Pleat it in the middle or just wad it up. Put a rubber band around it. Make the rubber band goes around it several times. Presto, not the most beautiful thing but cheap enough, works great and when it's worn out make a new one.
Project 6 - Back Scrubber
Materials:
Approx. 18 yards of 6" wide bridal tulle* for scrubber;
approx. 12 yards of Sugar and Cream cotton yarn (worsted wt.) for handles.
US #17 knitting needles and US "J" crochet hook.
*Bridal tulle is available on spools (and in *colors*) in the floral/bridal department of the craft store where I work. For industrial strength exfoliation, you can substitute strips of nylon net.
Pattern:
Cast on 10 stitches with tulle, just as it comes from the spool. (It will bunch itself up very nicely without any effort on your part)
Knit 30 rows of garter stitch (i.e., knit every row) - 15 ridges.
Bind off.
Handles:
With Sugar and Cream yarn and "J" hook, make a slip knot and anchor it with a slip stitch at the right edge of one end of the scrubber. Sc (single crochet) in each knit st. across the end of the scrubber, enclosing the cast-on or bind-off "tail" as you go. Secure with another slip stitch.
This will be one end of the handle.
Chain 40, slip st in first sc made (you've just attached the other end of the handle).
Ch 1, then sc in each ch of handle. Secure with slip st. Snip yarn and run end under sc stitches along end of scrubber.
Repeat for second handle.
Project 7 - Angel O’ Tulle
Designed by Karen Booy
Materials Needed
DRESS: 48" length of 6" wide Enhanced Sparkle Gold Dot on White Tulle*
HEAD: 1" wooden bead -- Lara's Crafts
FACE: Black acrylic paint and paint brush Pink Powder Blush and a Q-tip; 6" of 1/4" gold ribbon
ARMS: 6" White pipe cleaner
WINGS: 18" length of 3" wide Wire Edge Gold Flitter on White ribbon*
HAIR: Yellow curly hair -- One & Only Creations or Spanish moss, gold pot scrubber, or sheep's wool
HALO: 4" of star garland or wedding ring
WAND: Round party toothpick; small wooden star sprayed gold -- Lara's Crafts
HANGER: 6" Gold thread or wire
Assembly Instructions
DRESS: Cut 2 pieces of 6" wide enhanced sparkle gold tulle* each 24" in length. Fold each piece in half lengthwise and place one on top of the other. Pin folded tulle edges in place with straight pins to hold tulle and prevent it from moving as you baste. With a double thickness of thread baste 1/8" from folded edge. Gather up thread and tie dress securely.
HEAD: With low-melt glue gun, glue 1" wooden bead to the top of the gathered dress.
FACE: With black acrylic paint, place two dots for eyes on wooden bead. Use a Q-tip to apply pink blush for cheeks. Tie bow made from 6" of 1/4" gold ribbon and glue above dress in center front under head.
QUICK TIP: Shake the small bottle of acrylic paint and unscrew lid. Using the wooden end of the paint brush, place end into the lid of the paint bottle. The small amount of paint in the lid will be just enough paint to make your eyes. Dot the end of the paint brush on the wooden knob and you should have a perfect eye. Repeat.
ARMS & WAND: Cut a white pipe cleaner 6" long, bend in half, and glue the midpoint to the back of the head just above the dress. Form elbows by bending each arm at midpoint. Glue a small wooden star to the end of a round party toothpick. Spray with gold spray paint. Fold end of pipe cleaner arm around wand.
HAIR: With low-melt glue gun, make a hairline and carefully apply hair. For the hair you can use Spanish moss, sheep’s wool, a gold pot scrubber or any of the craft hair available in your local craft store.
HALO: Glue wedding ring to top of head for a halo. A halo can also be made from 4" of star garland or a gold glitter stem (pipe cleaner). Form a circle by meeting both ends of the garland or pipe cleaner and twist or glue ends. Glue to top of head.
WINGS: Tie a bow using 18" of wire-edge gold flitter ribbon* and glue to back of angel to form wings.
HANGER: Cut a 6" gold thread or wire. Fold in half and tie a knot at the end. Glue to top of halo for hanger.
Project 8 - Votive Spray Favors
From Your Wedding Company
Thank bridesmaids and guests with these pretty votive candle favors. Arrange several together for a great bridal shower centerpiece or place one at each place setting. Write each guest's name on the leaves for pretty place cards. You can also write your names and wedding date for personalized reception favors.
Materials and Tools:Step 1. Position the Candle
- Large Tulle Circles - 15" Diameter, any color (3 each)
- Satin Ribbon - Any color, wide (34 inches)
- Pearl Sprays - White (2 each)
- White Satin Leaves - White or Green (1 each)
- Votive Cups - Clear (1 each)
- Votive Candle - Any color, scented or unscented (1 each)
- Sharp Scissors
- Permanent Pen - Any color ink
Lay three tulle circles on the table slightly staggering the edges. Put the votive candle into the votive cup. Place both on the center of the tulle circles as shown.
Step 2. Gather the Tulle
Gather the tulle circles around the votive cup.
Step 3. Tie the Ribbon
Cut a 34" piece of satin ribbon and tie it around the tulle as shown.
Step 4. Separate the Tulle
Gently separate the layers of tulle with your fingers.
Step 5. Name Tags
Using a permanent pen write the name of the bridesmaid or guest on the leaf. Here we used one with gold ink.
Step 6. Preparing the Embellishments
Twist the stems of the leaf and the pearl sprays together as shown.
Step 7. Placing the Embellishments
Gently pull apart the tulle until you find the center hole. Position the pearl sprays and leave in the hole. You may use a glue gun to secure them if desired.
Step 8. Optional: Create the Centerpiece
Place several of the finished favors onto a tray, stand, plate or upside-down flowerpot for an instant centerpiece. These favors also look cute at each place setting.
To purchase the completed favor or see more pictures, go to http://www.yourweddingcompany.com/index.php/action/showProject/projectId/24/categoryId/109/
Project 9 - Garden Memories
With tulle circles, wrap a thimbleful of wildflower seeds, tied with a white ribbon. Place at each plate with a note thanking the guest for helping to sow a new life, and request that they plant the flowers to celebrate the couple's union.
Project 9 - Starfish Pew DecorationNo beach-themed wedding is complete without starfish! This pretty pew decoration is inexpensive and very easy to make. Decorate pews or chair ends during the ceremony, then move the bows to the reception to decorate chairbacks, tables, doors or walls. This bow also resembles a jellyfish when complete! Great for wedding, prom, or nautical-themed events.
Materials and Tools:Step 1. Gather the Tulle
- Chiffon Ribbon - Any Color (2 yards)
- Satin Edged Ribbon - Any Color (2 yards)
- 54" wide Tulle Draping - Any Color (2 yards)
- Natural Starfish - Large (7 each)
- Pew Clips (1 each)
- Sharp Scissors
- Hot Glue Gun
When cutting the tulle for this project, decide how high you want your pew decoration to be and multiply the length by two. Fold the tulle in half and gather it about 6 to 8-inches down from the fold. This will form a loop of tulle at the top. Secure the loop at the top by tying ribbons around the tulle and letting them hang freely.
Step 2. Fan the Tulle
Starting with one edge of the tulle, gently fan it out with your fingers until you reach the other edge.
Step 3. Add More Detail
Tie on more ribbon if desired. Here we added a satin-edged chiffon to the center. The ribbon mimics tentacles on a jellyfish. You could also add pearl strings or raffia depending on the formality of the event.
Step 4. Glue on Starfish
With a hot glue gun, attach a starfish to the center of the pew bow. Then randomly glue three more to the upper part and three to the lower part of the pew bow in the same manner. Press the glue through both layers of tulle to give the whole bow some rigidity.
Step 5. Hide the Edges
Hot glue the tips of the fanned out tulle to each other so that they are hidden behind the drape.
Step 6. Hang and Trim
Use pew clips or ribbon to attach the bow to your pews, tables, or chairbacks. Tacks work best for walls. Trim the bottom edge of the bow with sharp scissors for a clean, finished edge.
To see more pictures, go to http://www.yourweddingcompany.com/index.php/action/showProject/projectId/33/categoryId/107/
Project 10 - Tulle HeartsStack up sheets of tulle (as little as a third of a yard of each color or scraps from your sewing projects), cut through them using a heart pattern and then sew four or six hearts together. Even preschoolers may be able to sew by hand using perle cotton. Older children may enjoy stitching by machine, perhaps zigzagging with a metallic thread. Leave a small opening where you can insert a funnel and pour in dried lavender. Close up the seam, add a ribbon for a hanging loop and trim with as many embellishments as you like: star-shaped sequins, ribbon flowers, lace, beads or bows. Presto! You have a sachet for someone to hang in the closet or as a tree decoration.
Project 11 - Flower Girl Project
Download and Print the Flower Girl Project
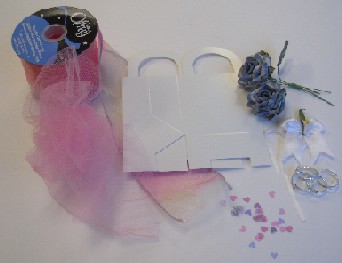
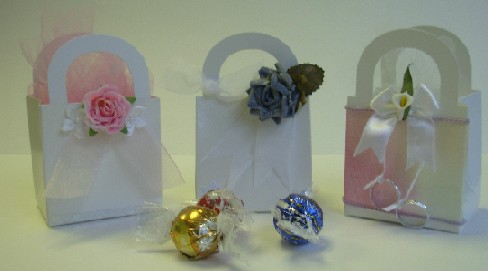
Project 12 - Wedding Favor Boxes
Do it Yourself and Save on Costs for the Big Day!
Materials:
Clear glue sticks/glue gun
Cardboard favor boxes (white or any other color)
Decorations: silk flowers, rhinestones, charms, confetti
Tulle
1.) Heat up glue gun and put in clear stick of glue.
2.) Construct the favor box if it comes folded.
3.) Decide which decorations you want to use and the best placement.
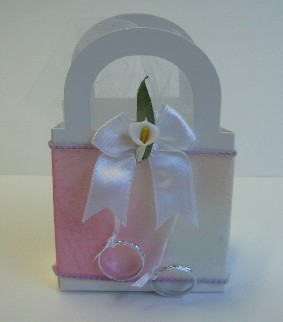
4.) If you plan on using a wide ribbon as a backing (like in the lily example) measure and glue down the ribbon on the edges only first. Otherwise the glue will show through the sheer ribbon. Tip: Only do the front and back and not the sides if the favor box is like in the example and folds at the top. Otherwise the ribbon will get crinkled when you go to close up the box.
5.) Begin gluing on your decorations.
6.) Cut a square of tulle 6x6 inches and place candy or favors in the center.
7.) Place tulle and candy inside favor box and lightly glue the corner of the box together so that the tulle peaks out, but the candy will stay inside. Do not over glue.
The little boxes seen here are a great starting off point for personalized wedding favors! Add decorations, flowers, charms, ribbons!
Another variation to personalize further would be to print the couple's name and wedding date on cardstock, cut out with fancy edged scissors and glue on the front.
Project 13 - Gold and White Wreath
If you'd like something a little out of the ordinary hanging on your front door this winter then this wreath is just for you.
Crafting Time: about 1 1/2 hours for a 12 inch wreath
Materials
1 yard gold embossed tulle (found in fabric stores and craft departments)
scissors
12 inch white foam wreath form
ordinary straight pins
2 yards (about) of 3 inch wide mylar ribbon
wreath wire (other wire will work also, thin wire is easier to work with)
several small gold ball ornaments (you can even use those from an old holiday decoration)
Instructions
Cut the tulle into 2 - 3 inch squares. They do not have to be exact. To attach the tulle to the wreath, gather all four corners of a square together and stick a straight pin through them. Push the pin into the foam wreath form. Continue in the same manner and attach all the little "puffs" to cover the front of the wreath form. To make the bow, wrap the ribbon around a 7" piece of cardboard. Slide the ribbon off the cardboard and wrap wire around the center of the ribbon loops. Separate each loop to make a full-looking bow and attach the bow to the wreath with wire. Use additional wire to make a hanger for your wreath. Nestle small gold balls into the tulle around the wreath and glue them in place.
By Marie E. Cecchini from West Dundee
www.thriftyfun.com
Project 14 - Tutu
Tutu + Tutorial = Tuturial
Here's a tutorial for those of you don't want to wrestle tulle, invisible thread, and a sewing machine in order to create the tutu of your little girl's dreams. It's so easy - a child can do it herself! (that is, if she can tie her own shoes!)
Step 1: Cut and sew elastic to form waistband. I use 20 inches for most of my tutus, which fits most kids.
Tutu Tip: If you want to go all pro - there are even fun colored elastic cords that can be used instead of plain old elastic. Or you can use a belt!
Step 2: Cut 4-5 yards of tulle into strips. And, cut, cut, cut some more. I do some thicker strips, some thinner.
Tutu Tip: You can use solely tulle. You can also add in streamers of ribbon, or other whimsies tied in here and there. You can use a solid color tulle, or alternate amongst a few different colors.
Step 3: Tie your strips onto the elastic. I vary the length of some, just to give it more poof and visual layering. Align your knots all on one side of the waistband, of course. They don't HAVE to be crammed together. As long as you use 4 yards worth of tulle, the tutu will be immensely fluffy.
Tutu Tip: I put the waist band around my leg, slide up thigh-high..and it makes tying and controlling the tulle a lot easier!
Voila. An easy- tutu in three easy steps (not counting the hours and hours of laborious tying BEST SPENT IN FRONT OF THE TV.)
Project 15 - TutuYou're going to need 2-8 yards of tulle, found in your local fabric store. Tulle seems to range in price from very cheap (I got mine for less than $1 a yard) to not really at all expensive for fabric (I saw some tulle for like $6 a yard - it was rather fancy looking). Two yards will suffice for a children's tutu. I doubt most of you are wanting to make one for a kid though. I used six yards for mine - my tutu is ridiculously poofy and has about a six inch gap with no material. One day, I'll fix that, but for now I just twist it to the side. Depending on how you cut your stripes and tie them on, you may need more or less fabric.
First, you're going to need to cut the tulle into strips. My tulle just happened to be twice as wide as I wanted my tutu's length to be, so I decided it would be easiest to loop the tulle around the ribbon. I cut my stripes about 4 inches wide - the width of these stripes is going to determine the poofiness, so use my tutu to judge.
After you have your strips cut, you're going to want to fasten them to a ribbon or elastic. If you use ribbon, make sure it matches the tulle - or at least compliments it. I forgot to buy ribbon from the fabric store and all I had laying around with some olive green piece. There are several methods for fastening the strips to the ribbon - you can sew them, tie them, or probably even use fabric glue. I opted to tie them on. Because my strips were twice the length I wanted, I just doubled them over and looped them around the ribbon.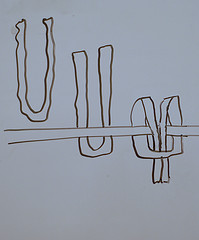
Because I am such a horrible explainer of what I mean by 'looping around the ribbon', I drew a picture. Unfortunately, I am also a horrible drawer. I opted to crop out the final result, which is what you achieve by pulling the ends tight, but I don't think it's a crucial element. Just know that in the drawing below, you are actually looking at what will become the inside of the tutu's waist. You want the clean part of the loop on the outside, as in the photo above.
Thanks to ambrosialove!
More Ideas:
Chairback Decoration
Project 16 - Crochet Pot Scrubber
Cutting the netting that comes by the yard can be a real hassle. I used to do it that way for years. It took quite awhile to get a system worked out using my cutting mat and a rotary cutter. I make and sell scrubbies from my website ( http://www.knitsandbitsbylinda.com/Scrubbers.html ) so I needed a way to get the job done quickly.
Then I was contacted by a company who makes the nylon netting. I am able to buy wholesale (since I am a business) and not only that, they cut it and roll it onto spools for me. I now offer the spools for sale to customers who want to make the scrubbies themselves. ( http://www.knitsandbitsbylinda.com/nylon-netting.html ) I have 32 colors to choose from. The spools are 3" wide by 40yds long, enough to get 3 double sided scrubbers from each spool, following my pattern, which I include free with every order of netting spools.
To answer the question on how to work with the netting: once the strips are cut and tied together (or use my spools) you use the netting as if it were a yarn by scrunching it up over your fingers like yarn would flow. (see picture) It is rough material and stiffer than yarn. It does take some getting used to but once you get the hang of it you'll be able to whip these things out in no time!
Hope that helps!
Linda
Project 17 - Princess Tulle Tiara
Tulle…how I love tulle. It reminds me of princesses and weddings and ballerinas. It is soft, flowy and easy to work with. It comes in many colors - even with shimmery glittery sparkles.
I think tulle loves me back.
Here is a simple tutorial on how to make Princess Tulle Tiaras made of flexible wire that is adjusted by tie on ribbons to fit the size of your head. These tiaras are easy to make but it may take you up to 30 minutes to complete one, depending on the amount of beads that you use. The more beads, the less time spent on a tiara because the beads act as “fillers” and you spend less time tying on tulle pieces. More tulle gives you a fluffier tiara.
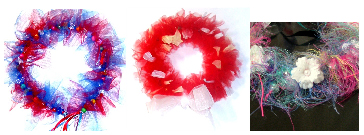
First, here are sample photos of some Princess Tiaras. Photo 1: More Beads, Less Tulle. Photo 2: No Beads, Tulle. Photo 3: Fancy Eyelash Version sold on Etsy.
Materials Needed:
18? Craft Wire, 16 or 18 gauge. The higher the gauge number, the more flexible the wire.
Beads
Tulle cut into strips of 2? x 3? but no need to be perfect.
Ribbons - about 40? or more of the colors you like.
Needle nose pliers
Step 1: Bend wire to create a loop on one end. The other end is open so you can slip beads through. If you are not adding beads, loop the other end of wire also.

Step 2: Tie on tulle strips (double knot) and slip on beads. The number of tulle strips and beads you want to add is up to you.

Step 3: Loop the other end of your wire to close.
Step 4: Tie long ribbons onto the looped ends.
Adjust to head size and tie ribbons to secure.
Project 18 - Tulle Poofs
http://www.oncewed.com/index.cfm?postID=316&title=DIY_Ethereal_Tulle_Poofs
Project 19 - Tutu
Mommy's Martini: Tutu-torial
Project 20 - Orange place setters
Orange place setters
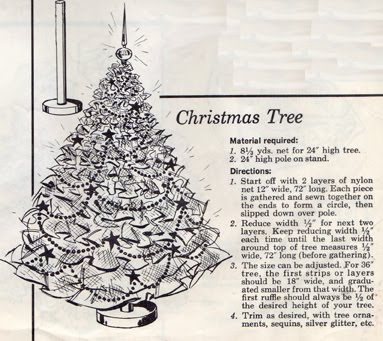
Project 21 - Tulle Christmas Tree
